Setting up a permanent disc golf basket is a rewarding endeavor that transforms any outdoor space into a play-ready course, inviting both casual players and serious competitors alike. Did you know that the accessibility of a well-placed basket can dramatically enhance the enjoyment of the game? Understanding how to install your basket properly not only ensures its longevity but also contributes to the dynamics of gameplay, affecting everyone from beginners honing their skills to advanced players strategizing their next throw. This guide will walk you through each step of the installation process, addressing common concerns and providing tips for creating a challenging yet enjoyable environment. Whether you’re looking to enhance your backyard, create a community course, or simply improve your throwing practice, our comprehensive setup guide will equip you with the knowledge you need. Keep reading to unlock the key steps to successful disc golf basket installation and elevate your game!
Choosing the Right Disc Golf Basket for Your Needs
Choosing the right disc golf basket can significantly enhance your playing experience, whether you’re a newcomer getting your first setup or a seasoned player looking to add to your course. The variety of baskets available caters to different needs, skill levels, and environments. Considerations such as material, weight, portability, and design features are essential when making your decision.
When evaluating baskets, think about the different types available-permanent vs. portable. Permanent baskets, often made of heavy metal and designed for long-term outdoor use, tend to provide the best durability and stability. They are ideal for courses that will see year-round play and can handle diverse weather conditions. In contrast, portable baskets offer versatility for those who want to practice in various locations or set up temporary courses for events or casual play. These are usually lighter, making them easier to transport and set up but may lack some of the durability of permanent options.
Another crucial factor to consider is the basket’s design. Look for features such as a deep catching area, a strong chain configuration that reduces bounce-outs, and visibility colors that help players locate the basket easily from a distance. The number of chains can also influence gameplay; more chains typically mean better catchability. For serious players, investing in a high-quality basket from reputable manufacturers ensures you have a product that meets tournament standards, should you ever wish to host official events.
Ultimately, it’s vital to assess your specific needs and preferences. Whether you’re looking for a basket to practice alone in your backyard or planning to install multiple targets for a small course, your choice should align with how you intend to use the basket. Consult with local disc golf communities or retailers to gather insights and firsthand reviews, as they can vastly enhance your understanding of which products might best suit your playing style.
Essential Tools for Installation Success
To set up your disc golf basket properly, having the right tools at your disposal can make all the difference in ensuring a successful installation. Whether you’re an enthusiastic beginner or a seasoned player adding to your course, being well-equipped will save you time and effort, leading to a professional-grade setup.
Essential Tools for Installation
- Shovel: A sturdy shovel will help you dig the hole needed for the installation tube. Opt for a spade for precise digging or a post hole digger for deeper, narrower holes.
- Level: Ensuring your basket is level is crucial for gameplay consistency. Use a bubble level or a laser level to check for evenness after setting up the installation tube.
- Concrete Mix: You’ll need a quick-set concrete mix if you want your basket to stay put. Follow the manufacturer’s instructions regarding water ratios for optimal strength.
- Installation Tube: The basket typically comes with an installation tube that should be secured in the ground with concrete. Make sure the tube is straight and positioned correctly before the concrete sets.
- Protective Gear: When working with concrete, gloves are essential to protect your hands. Additionally, consider knee pads for comfort while digging or adjusting the basket.
- Water Source: Access to water is necessary for mixing concrete. Ensure you have a bucket, hose, or another source nearby to make this process smoother.
- Trowel: A trowel is useful for smoothing out the concrete around the installation tube and helps achieve a professional-looking finish.
- Other Helpful Tools: Depending on your site, you might also want a hammer for driving stakes into the ground, a measuring tape for accurate positioning, and chalk or spray paint for marking the location.
By gathering these tools ahead of time, you can streamline your installation process and focus on what really matters – creating an enjoyable disc golf experience. Taking the time to prepare will not only enhance the installation but also ensure maximum fun and utility from your new basket for years to come!
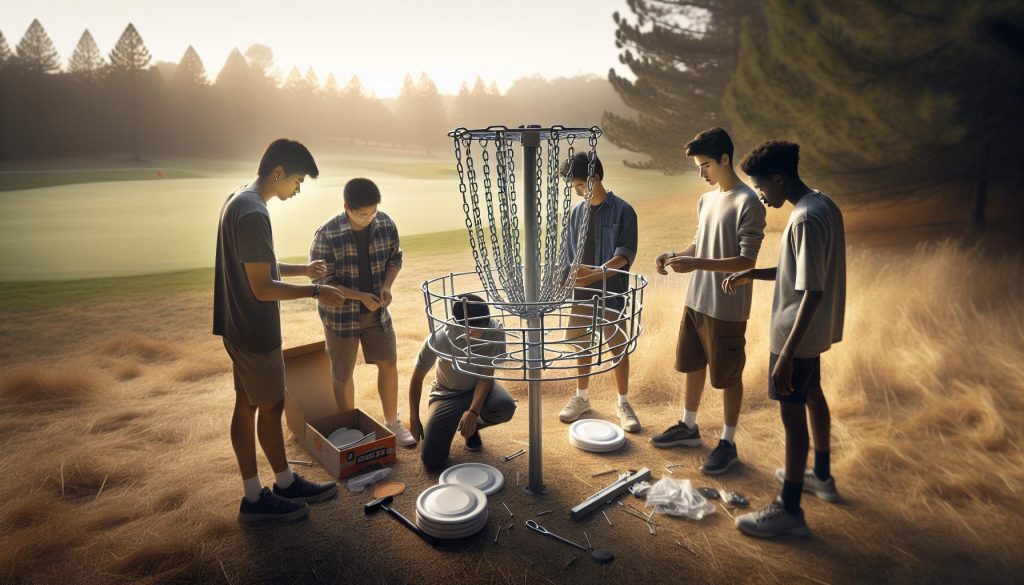
Step-by-Step Guide to Installing Your Basket
Installing a disc golf basket is not just about setting up a target; it’s about creating a welcoming space for enthusiasts to hone their skills and enjoy the game. With the right preparation and execution, your installation can become a cherished spot in your local disc golf community. Follow this detailed step-by-step guide to ensure your basket is set up correctly and ready for action.
Start by marking the location for your basket. A good choice is an area that is clear of trees and other obstacles, ideally surrounded by a variety of throwing lines. Measure the desired distance from the tee pad to the basket position; typically, this is between 80 to 100 meters for a par 3 hole. Once you’ve identified the perfect spot, mark it with a small stake or spray paint.
Next, it’s time to dig the hole for the installation tube. Using a post hole digger, create a hole deep enough (usually around 24 inches) to securely set the tube. Ensure the hole is wide enough to accommodate the tube without too much excess soil; a diameter of about 12 inches is often sufficient. After digging, remove any loose debris to create a clean and stable base.
Once your hole is ready, place the installation tube in the center. This tube should be vertical; use your level to ensure it’s straight. It’s crucial for the gameplay that the basket is positioned correctly, as a crooked installation can impact throws. Next, mix your quick-set concrete according to the manufacturer’s instructions and carefully pour it around the tube, filling the hole. As the concrete starts to set, tap around the base gently to help eliminate air pockets and ensure stability.
After allowing the concrete to cure for the recommended time (typically 24 hours), attach the disc golf basket to the top of the installation tube. Check the level again, adjusting as necessary before securing all fittings tightly. Lastly, take a moment to clean up the surrounding area by removing any excess dirt and debris, ensuring the site is safe and inviting for players.
With these steps completed, your disc golf basket will be ready to withstand the elements and provide countless rounds of fun for players of all skill levels! Enjoy your new setup and watch as it becomes a central hub for your local disc golf community.
Optimal Placement: Tips for Maximum Enjoyment
The joy of disc golf is magnified by thoughtful and strategic placement of your basket. A well-situated basket can enhance not only the enjoyment of individual players but also the overall flow of the course. The ideal placement considers various factors, including terrain, accessibility, and interaction with other holes, ensuring that players of all skill levels can engage with the challenge.
Start by evaluating the landscape around your installation site. Look for natural features that can help create an exciting yet accessible hole. Placing the basket near trees, water hazards, or elevation changes can make for a more dynamic experience, pushing players to think creatively about their throws. Aim for a distance between 80 to 100 meters from the tee pad, which is typically recommended for par 3 holes, but doesn’t shy away from adjusting based on the skill level of your players. Including multiple throwing lines will also enhance the challenge, allowing players to choose their approach shot based on their strengths and preferences.
It’s essential to consider safety and accessibility as well. Ensure that the basket is not too close to walkways or residential areas where misthrows could pose a risk. Avoid locations that may encourage foot traffic directly around the basket, as this will deter potential collisions and create a more pleasant atmosphere for everyone. Additionally, protecting the integrity of the course from weather conditions is crucial; placing the basket in a well-drained area will maintain its usability year-round, preventing muddy conditions that can detract from the experience.
Finally, engage with your local community for insight and feedback. Fellow disc golfers often have invaluable experiences and ideas for optimal placements based on various weather conditions or common play patterns. Collaborating on the setup not only leads to a more engaging layout but also strengthens community ties, ensuring that your disc golf course is a treasured spot for all players, from casual enthusiasts to serious competitors.
Leveling Your Disc Golf Basket: Why It Matters
To ensure that your disc golf basket delivers the best experience to all players, leveling is an often-overlooked yet crucial part of the installation process. A properly leveled basket not only enhances the aesthetic appeal of the course but also significantly impacts gameplay. An unlevel basket can cause erratic disc behavior, leading to frustration among players and potentially affecting their performance. Therefore, taking the time to ensure your basket is accurately leveled will contribute to fair and enjoyable rounds of play.
When installing your basket, start with a solid and stable base. This is usually achieved by digging a hole that is adequately deep and wide enough to accommodate the weight of the basket and base material. As you insert the pole into the hole, use a level to check its vertical alignment. Adjust the position as necessary before securing it. Pouring concrete around the base can help keep it stationary. Allow the concrete to set properly, ideally overnight, to ensure your basket remains securely anchored and level once the concrete has cured.
Keep in mind that environmental factors can cause a level basket to shift over time. Soil erosion, settling, or even the natural movement of wildlife can affect the positioning of your basket. Therefore, regular checks and maintenance may be needed to address any discrepancies. If you notice that your basket has tilted, it’s usually a straightforward process to remedy it by adjusting the anchor or adding more material to one side until it is perfectly leveled again.
Incorporating a level basket into your disc golf course not only promotes fairness but also allows players to develop their skills without the added variable of an uneven target. Emphasizing this aspect during installation and maintenance will fortify the integrity of your course, ensuring that it remains a welcoming and enriching environment for both newcomers and competitive players alike.
Maintenance Tips for Your Disc Golf Basket
Maintaining your disc golf basket is essential for ensuring a reliable and enjoyable experience for players of all skill levels. An overlooked basket can lead to inconsistent gameplay and frustrations, but with a little routine care, you can keep your equipment in top shape. Regular maintenance not only extends the life of your basket but also enhances the overall aesthetic and functionality of your course.
One critical aspect of maintenance involves the chains. Over time, chains can rust or become stiff, affecting their ability to catch discs effectively. To combat this, consider using a quality degreaser to clean the chains thoroughly. A simple spray followed by a gentle scrub can remove dirt and buildup, allowing for smoother operation. After cleaning, applying a lubricant specifically designed for metal components can help protect against rust, ensuring that your basket remains a reliable target for years to come [2].
In addition to chain care, inspecting the overall condition of your basket should be a regular part of your routine. Check for any signs of wear and tear, especially at points of joint and contact, where rust or bending may occur. Address any issues immediately-tightening loose bolts or replacing damaged components-can mitigate larger repairs down the line. A community approach can also be beneficial; engage with local disc golf enthusiasts to share best practices and even conduct group maintenance days to keep things fun and light-hearted [3].
Lastly, consider environmental factors that may impact your basket’s condition. Depending on your location, exposure to rain, snow, or even sunlight can affect materials used in baskets, leading to fading or deterioration. If possible, treat your basket with protective coatings to help resist the elements, and regularly clear away any debris, such as leaves or branches, that might accumulate around the base. By investing time in proper maintenance, your disc golf basket will remain a welcoming target, promoting fair play and enhancing the enjoyment for both newcomers and seasoned competitors alike.
Customizing Your Disc Golf Basket Setup
can elevate your course’s appeal and functionality, allowing players from beginners to veterans to enjoy the game more fully. Whether you’re installing a single basket at a local park or planning a full course, creativity in your setup can also enhance the overall experience for all participants. Here are some strategies to make your setup truly unique.
First, consider the basket color and design options. Many manufacturers offer baskets in various colors and styles. Choosing a bright color can increase visibility, making it easier for players to spot the basket from a distance. Alternatively, a more understated, natural color can make the basket blend seamlessly into the landscape, which is often preferred in wooded courses. Additionally, certain designs with artistic elements can make a course feel more inviting and enjoyable, sparking a sense of pride in the local community.
Next, the surrounding decor plays an important role in customization. You can enhance your setup by adding thematic elements around the basket. This may include planting flowers or shrubs that frame the basket nicely, or even creative landscaping features like stones or paths leading to the basket. Not only does this increase the beauty of the playing area, but it can also assist in guiding players and creating a more immersive experience.
Moreover, integration of interactive elements can engage players. Consider installing a practice area adjacent to your basket where newcomers can work on their throwing mechanics. You could also include signage with tips on technique or discipline-specific advice, creating an educational aspect to your course. Courses that incorporate local culture, such as sculptures or signs from local artists, can enhance the community connection and promote local pride.
Lastly, the functional layout of your basket setup is critical. When deciding on distance and configuration, ensure that the space allows players to retrieve discs easily without interfering with other players. Consider adding a nearby bench or seating area where players can gather and share tips or relax, fostering a community atmosphere. By carefully planning these aspects of your installation, you can create a disc golf course that is not only functional but also inviting and supportive of player growth and enjoyment.
By embracing these customization ideas, you can differentiate your course and create a memorable experience that resonates with the disc golf community.
Understanding Local Regulations for Installing Baskets
When setting up a disc golf course, understanding local regulations is crucial to ensure a smooth installation process and long-term enjoyment for players. Each municipality, park, or private property may have specific rules regarding where and how you can install baskets. Ignoring these laws can lead to fines, removal of the baskets, or even legal action. Thus, it’s wise to conduct thorough research before beginning your project.
Start by contacting local government offices or park authorities to inquire about existing policies on installing sports equipment in public areas. Some key areas to focus on include:
- Permits and Approvals: Many locations require permits for installation. Submit detailed plans that outline your basket setup, design, and intended use to get the necessary approvals.
- Zoning Laws: Understand how zoning regulations may impact your installation site. Some areas might restrict the types of structures you can put up, including baskets.
- Environmental Considerations: In some regions, there are laws that protect natural habitats, meaning you may need to factor in tree cover, wildlife conservation, and landscaping in your design. Additionally, be aware of any required environmental assessments.
- Community Feedback: Engaging with local residents and disc golf enthusiasts can create goodwill toward your project and provide valuable insights on how the setup may impact the community.
To ensure compliance, it’s often beneficial to collaborate with a local disc golf association or club. These organizations can offer guidance, assist with securing permits, and sometimes even help with fundraising or volunteer support. By integrating local voices into your planning, you not only enhance the acceptance of your project but also build a supportive community around disc golf.
Ultimately, while navigating regulations may seem daunting, thorough preparation and community engagement can transform obstacles into opportunities. By adhering to local guidelines, you’re laying a foundation for a successful and sustainable disc golf course that stands the test of time.
Troubleshooting Common Installation Issues
When installing a disc golf basket, even seasoned enthusiasts can encounter installation hiccups that may affect gameplay enjoyment. Understanding common issues and their solutions can ensure that your setup is smooth, stable, and fulfilling for every player. Here are some practical tips to troubleshoot frequently faced challenges during installation.
One of the most common problems is an unstable or wobbly basket. This often results from inadequate anchoring and can lead to frustrating gameplay experiences. To remedy this, ensure your installation site is level and solid. Use a power drill to create a deep sleeve for the basket, and use a concrete mixture for added stability. If the basket is already installed and wobbles, check that the screws and bolts are tightened correctly and consider adding more support by digging around the post and refilling it with compacted gravel or concrete.
Another issue that installers might face is incorrect basket height. The standard height of the basket rim should be 1.07 meters (3.5 feet) from the ground. If your basket is too high or low, it can lead to inconsistencies in gameplay. To adjust the height, reassess your installation method. If using a permanent sleeve, you may be able to raise the entire basket by placing a spacer beneath it or modifying the sleeve depth.
Environmental factors can also present unexpected challenges. For example, placing a basket under a dense tree canopy can lead to obstructed throws and decreased enjoyment. If you find yourself in such a situation, consider relocating the basket or modifying its position by trimming branches to allow for clearer sightlines. It’s essential to think ahead about the flow of your course and how each hole interacts to create a fulfilling experience.
Lastly, keep an eye out for local regulations regarding equipment installation. Sometimes, local guidelines may restrict the sizes, types, or even the locations of disc golf baskets. If you encounter resistance from local authorities during installation, provide them with a solid plan and gather community support. Understanding and aligning your installation with local requirements can prevent lengthy delays or necessary adjustments after installation.
With these tips in mind, you’re better prepared to tackle installation challenges head-on, ensuring that your disc golf baskets are optimally placed and securely installed for endless enjoyment on the course.
Advanced Techniques for Pro-Level Course Setup
Creating a course that challenges experienced players while still being accessible to newcomers requires a thoughtful approach to design and installation of disc golf baskets. Advanced techniques can elevate your setup, enhancing the overall experience for both casual and competitive players alike. Utilizing strategic placement, considering natural obstacles, and knowing how to manipulate the environment can significantly impact gameplay dynamics.
One effective strategy is to incorporate elevation changes into your course design. Baskets placed on hillsides or elevated platforms can create interesting approaches and require varying throwing techniques, fostering skill development. If terrain allows, elevated baskets can also increase visibility of the target, making it more engaging for players. For instance, a basket positioned at the top of a small incline not only presents a rewarding challenge upon successful ascent but also offers a unique perspective for spectators.
Proper utilization of natural obstacles is another advanced technique. Instead of clearing areas of vegetation, think about how trees, bushes, and other environmental features can serve as strategic elements of your course. For example, placing a basket near the edge of a dense thicket can force players to navigate their throws carefully, promoting strategic shot planning and execution. Additionally, leveraging local wildlife paths or natural topography can enhance the flow of the course, making each hole feel more cohesive within its surroundings.
When it comes to basket installation, ensuring the target is placed in a way that promotes diverse throwing angles can be critical. Aim for a balance between the left-to-right and right-to-left fade of the basket location. This could mean aligning the target towards the back of an open field for a long-range shot or nestling it amongst obstacles to test players’ abilities to throw accurately under pressure. Furthermore, properly selecting your basket type-be it permanent or portable-will also contribute to the level of challenge. Portable baskets, while versatile, often require more careful positioning to ensure they withstand varying wind conditions.
Lastly, community engagement should not be overlooked. Involving local players in the course design can provide insights into preferred challenges and help foster a stronger sense of ownership and pride in the course. Regularly hosting informal tournaments or friendly competitions can also help identify which aspects of the course work well and which may need refinement, ultimately guiding future enhancements.
By crafting a course that embraces these advanced techniques, you can create an inviting yet challenging environment that respects the rich competitive spirit of disc golf while still celebrating the joy of play for everyone involved.
Finding Community Resources to Enhance Your Game
With the surge in popularity of disc golf, communities across the globe are rallying to support both new and seasoned players. Engaging with local resources can significantly enhance your game, unlock valuable insights, and foster a sense of camaraderie that is essential to the sport. Whether you’re looking to improve your throwing technique, understand the nuances of course design, or navigate the world of disc golf baskets, tapping into community resources is a great way to elevate your experience.
One of the most tangible resources you can access is your local disc golf club or association. These organizations often host regular events, clinics, and tournaments tailored to various skill levels. Participating in these gatherings not only helps you refine your skills through practical experience but also allows you to learn from fellow players. For example, many clubs offer beginner sessions that cover fundamentals like throwing mechanics and course strategy, which can be invaluable for newcomers seeking to improve quickly. Don’t underestimate the power of peer feedback-informal weekend games can expose you to different styles of play and new techniques.
Additionally, online platforms and local forums provide a wealth of knowledge specific to your area. Many disc golf communities share tips on installation and maintenance of baskets, updates about local regulations, and advice on optimizing course layout. Websites such as the British Disc Golf Association offer comprehensive resources including event listings and guidance tailored to local players, enabling you to stay informed and connected. Leveraging social media groups can also foster real-time discussions that feature everything from equipment recommendations to local course reviews, making it easier to find the best spots to play and practice in your region.
Lastly, don’t overlook retail disc golf stores, which often serve as communal hubs. They typically host events, offer lessons, and provide expert advice on equipment. Engaging with staff who are passionate about the sport can help you find the perfect disc for your skill level or even the ideal basket for your home course setup. These interactions can equip you with insights that go beyond sales pitches, transforming your understanding of what it takes to succeed in disc golf into a community-driven knowledge base. Embracing local resources creates not just better players, but a thriving network of enthusiasts who share a mutual love for the game.
Q&A
markdown
Q: What is the best way to prepare the ground for installing a disc golf basket?
A: Preparing the ground involves clearing debris and ensuring the area is level and free from loose soil. Compact the ground by walking over it or using a tamper to create a stable base for your basket, allowing for better support and longevity.

Q: How deep should I install my disc golf basket?
A: Ideally, install your disc golf basket at least 24-36 inches into the ground. This depth helps stabilize the basket against wind and play, ensuring it remains secure during use and can withstand inclement weather.

Q: Can I install a disc golf basket on concrete?
A: Yes, you can install a disc golf basket on concrete. Use a mounting sleeve or concrete anchor to secure the basket directly into the concrete. This method is ideal for permanent installations in urban areas or at parks.

Q: How do I ensure my disc golf basket is level after installation?
A: To ensure a level installation, use a carpenter's level to check equilibrium before securing the base. Adjust the height of the basket as necessary, and compact the soil or add gravel underneath to maintain balance.

Q: What are the benefits of using a portable disc golf basket instead of a permanent one?
A: A portable disc golf basket offers flexibility, allowing you to set up courses in various locations. It's ideal for casual play, practice sessions, and events while being easy to transport and store when not in use.

Q: Are there local regulations I should consider when installing a disc golf basket?
A: Yes, always check for local regulations regarding the installation of disc golf baskets. Requirements may include obtaining permits, adhering to zoning laws, and ensuring the basket does not infringe on public space or private property.

Q: How can I customize my disc golf basket setup for a unique experience?
A: You can customize your disc golf basket setup by adding features like alternate teepads, varied basket heights, or creating unique obstacle layouts. Utilizing natural terrain and incorporating creative landscaping can enhance the playing experience.

Q: What maintenance is required to keep my disc golf basket in good condition?
A: Regular maintenance includes cleaning the basket, checking for rust or damage, and making sure the securing mechanisms are tight. Seasonal checks ensure that the basket remains safe and functional for continued play.
Insights and Conclusions
Now that you’ve successfully set up your disc golf basket, it’s time to get out there and enjoy your new course! Remember, a well-installed basket enhances your gameplay experience and prepares you for exciting rounds with friends and fellow players. For more tips on improving your game, check out our guides on disc flight characteristics and throwing mechanics, or explore our equipment comparison tables to choose the perfect discs for your style.
If you found this guide helpful, don’t hesitate to subscribe to our newsletter for more expert insights and updates on disc golf gear and techniques. Share your installation experiences in the comments below, and let’s celebrate our passion for this incredible sport together! Keep exploring-your journey in disc golf is just beginning!